Enable WebSocket Tunnel
Communication between the ARM Router and the ARM Configurator may optionally be configured to use WebSocket Tunnel (VPN). This will enable deployment of Router instances in a Network Address Translation (NAT) environment. The Configurator and Routers will establish a new "overlay network". The address range known as "link local address" range, 169.254.0.0/18, will be used by this network. While every ARM Router in this network will have a unique address, the ARM Configurator will always be allocated 169.254.0.1.
|
➢
|
To enable WebSocket Tunnel: |
WebSocket Tunnel needs to be enabled in both the Configurator and the Router. It's accomplished through the UI on the Configurator side and a script on the Router side.
|
➢
|
To enable WebSocket Tunnel in the Configurator: |
|
1.
|
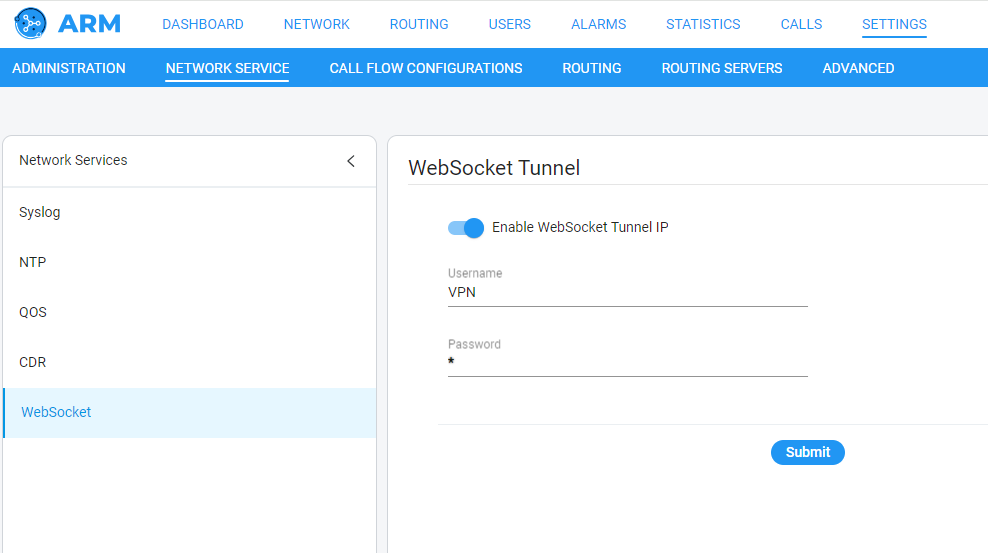
Open the WebSocket page (Settings > Network Services > WebSocket). |
|
2.
|
Configure the parameters using the following table as reference. |
|
|
|
|
Enabled
|
Select or clear the option to enable or disable WebSocket Tunnel.
|
|
Username
|
Enter the WebSocket Tunnel username.
|
|
Password
|
Enter the WebSocket Tunnel password.
|
|
➢
|
To enable WebSocket Tunnel in the Router |
It's possible to enable WebSocket Tunnel on both new and existing Routers. Regarding a new Router, the new Router will be added by the Configurator once the WebSocket Tunnel has been established.
|
1.
|
Log into the Router using SSH. |
|
2.
|
Switch user to root by "su –" |
|
3.
|
Enter the root password. |
|
4.
|
Validate the activity of the Router by using the following command: |
systemctl is-active tomcat.service
|
5.
|
If the Router isn’t active, execute the following command: |
systemctl start tomcat.service
|
6.
|
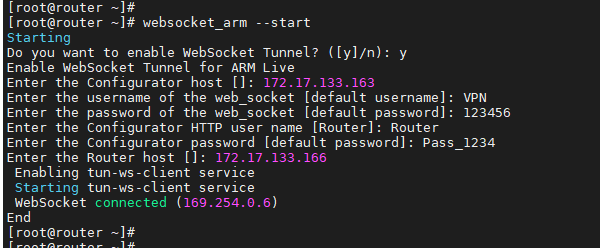
To run the WebSocket Tunnel script, execute the following command: |
websocket_arm --start
|
7.
|
Answer y to enable WebSocket Tunnel or n to quit. |
|
8.
|
Enter the IP address of the ARM Configurator. |
|
9.
|
Enter the username to match the WebSocket Tunnel username configured on the ARM Configurator. The default username is "VPN" (without quotation marks). |
|
10.
|
Enter the password to match the WebSocket Tunnel password configured on the ARM Configurator. The default password is "123456" (without quotation marks). |
|
11.
|
Enter the REST username to match the Configurator Credential username (Router type) configured on the ARM Configurator. |
|
12.
|
Enter the REST password to match the Configurator Credential password (Router type) configured on the ARM Configurator. |
|
13.
|
Enter the IP address of the Router itself. |
|
14.
|
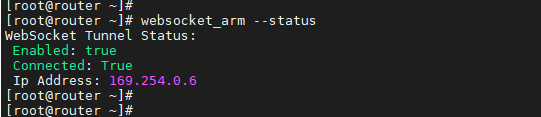
Check the WebSocket Tunnel Router status: |
|
●
|
Execute the following command: |
websocket_arm --status
|
15.
|
Check the WebSocket Tunnel Router status in the Configurator: |
|
a.
|
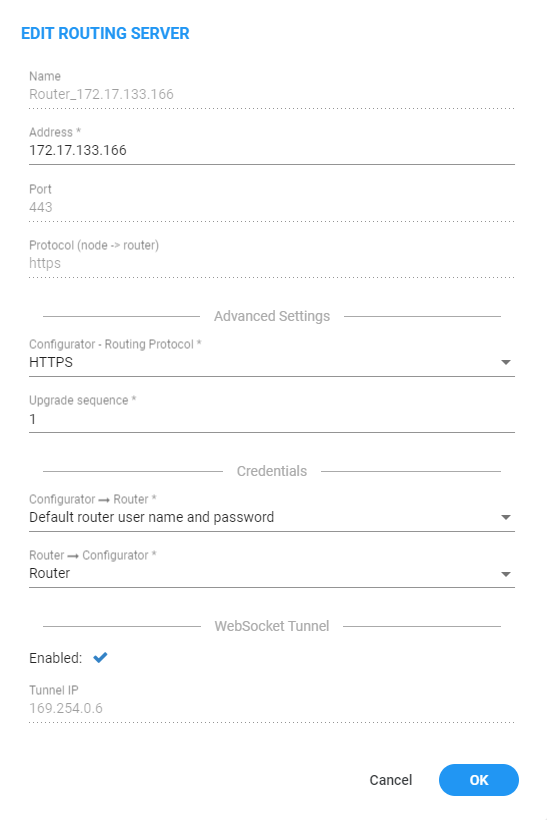
Open the Routing Servers page (Settings > Routing Servers > Servers). |
|
b.
|
Select the Router configured to WebSocket Tunnel and then click the edit icon. |
|
c.
|
Make sure the WebSocket Tunnel is enabled and the Router has a Tunnel IP Address. |
|
➢
|
To disable WebSocket Tunnel in the Router: |
|
1.
|
Log into the Router using SSH. |
|
2.
|
Switch user to root by "su –" |
|
3.
|
Enter the root password. |
|
4.
|
Validate the activity of the Router using the following command: |
systemctl is-active tomcat.service
|
5.
|
If the Router isn’t active, execute the following command: |
systemctl start tomcat.service
|
6.
|
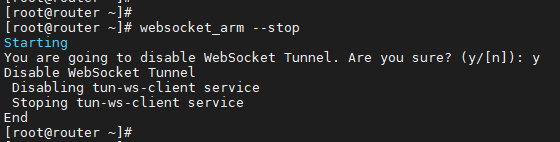
To run the WebSocket Tunnel script, execute the following command: |
websocket_arm --stop
|
7.
|
Answer y to disable WebSocket Tunnel or n to quit. |
|
8.
|
Check the WebSocket Tunnel Router status in the Configurator: |
|
a.
|
Open the Routing Servers page (Settings > Routing Servers > Servers). |
|
b.
|
Make sure the WebSocket Tunnel is disabled for that Router and that its status is enabled. |
|
➢
|
To disable WebSocket Tunnel in the Configurator: |
|
1.
|
Open the Routing Servers page (Settings > Routing Servers > Servers) and make sure there are no Routers configured to WebSocket Tunnel. |
|
2.
|
Open the WebSocket page (Settings > Network Services > WebSocket) and turn off the ‘Enable WebSocket Tunnel IP’ parameter. |